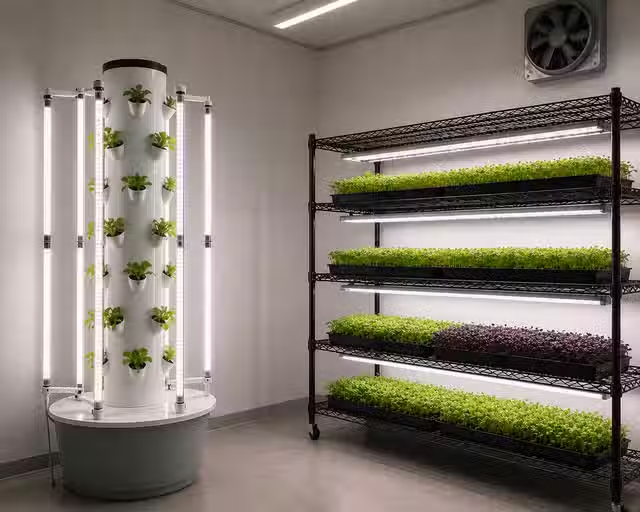
Key takeaways
The first decision is location: indoors gives you control but costs electricity for LED and ventilation; outdoors gives you free sunlight but requires a shade solution in hot climates like Thailand.
Structure comes second: a rack fits microgreens in a small apartment footprint, a tower reduces floor space further, an NFT water channel is for leafy crops at higher volume.
Growing medium affects moisture retention and reuse. Coco coir retains well, jute mats are cleaner for harvest, soil is forgiving but heavy.
Seed choice determines your failure rate. Radish and sunflower are forgiving at 5 to 7 days to harvest. Basil and cilantro punish inconsistent moisture and take 14 to 21 days.
The growth cycle has five phases: soak, germination, blackout, light, harvest. Skipping or rushing any phase shows up in yield weight, not just appearance.
Selling requires consistency across batches. Eating your own production is the fastest way to learn what your setup actually produces before you commit to buyers.
TL;DR
Most beginners buy equipment in the wrong order. Location and structure lock in your electricity cost and crop volume ceiling before you plant a single seed. Get those two right, then choose a medium that matches your water discipline, then pick seeds by difficulty not by what you want to sell. The grow cycle is fixed biology. Your job is not to rush it.
What a bad start actually looks like
The most common version: someone buys a rack, six trays, a bag of mixed seeds, and a grow light. They put it in the corner of a room with no airflow. The first tray looks fine. The second tray gets mold on day three. They assume it is the seeds. It is not the seeds. It is the humidity sitting at 85% with no circulation and the medium staying wet for 36 hours after watering because the room has no air movement. The rack was fine. The location was wrong.
Location is not aesthetic. It determines humidity baseline, airflow availability, and whether your LED heat load becomes a problem in summer. That decision happens before you buy anything else.
The decision sequence that most guides get backwards
Most beginner guides start with seeds. Seeds are the last decision. The sequence that actually matters is: location, then structure, then medium, then seeds. Each step constrains the next. If you pick indoors, you are now paying for light and moving air. If you pick a tower instead of a rack, your crop options change because root depth and medium type change. If you use coco coir, your watering frequency changes compared to jute. Only after those three are fixed does seed choice make sense, because now you know your humidity range, your light hours, and how fast your medium dries.
In a non-climate-controlled apartment in Bangkok, ambient temperature sits at 29 to 34 degrees Celsius for six months of the year. That changes evaporation rate, germination speed, and pathogen pressure simultaneously. The same radish seed that takes 6 days in a 22-degree room takes 4 days at 32 degrees and starts damping off at 36 hours after germination if airflow is not continuous. The seed did not change. The environment changed everything around it.
Indoors with LED: plan for 40 to 60W per tray depending on crop, plus a fan running 24 hours. Outdoors in a tropical climate: a 30 to 40% shade cloth reduces heat stress without killing photosynthesis. NFT channels require a pump running continuously, which adds to electricity cost but eliminates medium cost at scale.
Indoors vs outdoors: what the cost difference actually is
You control temperature, humidity, and light hours. That control costs money. A two-rack setup with four trays per shelf running 16 hours of LED per day pulls roughly 150 to 200W continuously. Add a small fan and you are at 180 to 240W. In Thailand that is approximately 35 to 50 THB per day. Over a 30-day month that is 1,000 to 1,500 THB just in electricity before you count medium, seeds, or water. The upside: year-round consistency. The downside: your break-even point starts higher.
If you are in a controlled apartment with stable humidity, start indoors. If you have outdoor space with partial shade and can cover the setup, outdoors is viable and cheaper to run, but harder to keep consistent.
Sunlight is free. In a hot climate, that is not always an advantage. Direct sun at 35 degrees Celsius at midday will burn most microgreens within two hours. A shade cloth at 30 to 40% density fixes that and costs a few hundred baht. Outdoors removes your electricity cost for light but adds variability: rain, insects, dust, and wind. For hydroponics outdoors, algae growth in the reservoir accelerates in direct sunlight, which means you need opaque reservoir covers and more frequent EC checks.
Rack, tower, or water channel: what each one is actually for
A rack with trays is the standard microgreen setup. Low cost, easy to clean, fits in a 60x120cm footprint. Each shelf holds two to four 10x20 inch trays. You can expand vertically as you add crops. The limitation is floor space and the fact that you need to manage each tray individually.
A tower reduces floor space by growing vertically. It works well for leafy crops like lettuce or herbs that do not need a blackout phase. Towers typically use a drip or wick system. They are not ideal for microgreens, which need tray-based blackout for germination.
NFT hydroponic water channel system showing nutrient film flowing under plant roots
An NFT water channel is for higher-volume leafy greens and herbs. Nutrient-rich water flows in a thin film across the roots continuously. Lower medium cost at scale, higher upfront cost for pump, pipes, and reservoir. Harder to troubleshoot for a beginner because problems in the water chemistry affect every plant in the channel simultaneously.
Start with a rack and trays. Add a tower or channel once you understand your water and nutrient baseline. A beginner who starts with NFT and does not understand pH drift will lose an entire channel of plants in 48 hours.
Growing medium: what you are actually choosing between
Good moisture retention, forgiving for beginners, roots into it so harvest is clean if you cut above the medium. Cannot be reused without sterilization.
No medium residue on the roots at harvest, cleaner for selling. Dries out faster than coco, so watering frequency increases. Works well in humid environments.
Most forgiving, best buffer for watering mistakes. Heavier, messier, and some buyers do not want soil on roots. Fine for personal consumption, less clean for selling.
No for microgreens
Medium to high
Used in hydroponic setups. Requires EC and pH management from the start. Not appropriate for first-time growers.
Yes with sterilization
Rockwool / hydroton
Low to medium
Start with coco coir or jute. Coco if your environment is dry or warm and you want a buffer. Jute if your humidity is high and you need faster drying between waterings.
Seed difficulty: what you should actually start with
Seed difficulty is not about flavor or market price. It is about germination consistency, sensitivity to moisture variance, and time to harvest. High-difficulty seeds fail in ways that are hard to diagnose for a beginner: they look fine until day five and then collapse. Low-difficulty seeds fail visibly and fast, which means you learn quicker.
Start with radish and sunflower. Run four consecutive trays of each before you try anything else. You are not growing for the market yet. You are calibrating your environment.
Fast, forgiving, high germination rate. Good first crop.
Needs soaking 8-12 hours before sowing. Robust and high yield.
Soak 8 hours, high germination, visible progress daily.
Smaller seed, needs even moisture distribution. Sensitive to overwatering.
Tiny seed, needs bottom watering. Easy to wash away with top watering.
Mucilaginous seed, needs precise moisture. Molds easily in high humidity.
Slow, uneven germination. Needs crushing the seed hull before sowing.
The five phases every crop goes through
Large seeds like sunflower and pea need soaking. Small seeds like radish and broccoli do not. Soaking large seeds without soaking reduces germination rate by 20 to 30% in high-temperature environments.
4 to 12 hours depending on seed size
Seeds go on the medium, get misted, covered with a tray or lid, and weighted. Darkness and humidity trigger germination. Weight on the cover pushes the seeds into the medium and straightens hypocotyl growth. Skipping weight produces bent, uneven stems.
Germination and blackout
Remove cover when the majority of seeds have germinated and the shoots are pushing against the lid. Move to light immediately. Delayed light exposure produces etiolated, pale shoots that do not recover color after two days.
Transition to light
16 hours of light, 8 hours dark for indoor LED setups. Bottom watering preferred after the cover comes off to avoid wetting the leaves and encouraging mold. Check moisture twice daily in temperatures above 30 degrees Celsius.
Light and growth
3 to 7 days depending on crop
Cut just above the medium. Wet harvest reduces shelf life. Harvest in the morning after the light cycle starts and the leaves have dried from the previous watering.
Cut at cotyledon stage for most crops, first true leaf for pea and sunflower
Eat it yourself first, then sell
Eating your own production for the first four to six weeks is not a consolation prize. It is the calibration phase. You learn what your radish actually tastes like when harvested at day five versus day seven. You learn how long your pea shoots stay fresh in the refrigerator. You learn whether your sunflower is producing the yield weight you expect per tray. None of that is measurable from photographs.
Selling requires batch consistency. A restaurant buyer who gets 80g one week and 55g the next will not reorder. Before you approach a buyer, run the same crop five times and record harvest weight per tray. If your variance is above 15%, your process is not stable enough to sell from. Fix the variable causing the variance first.
In most urban markets, radish, sunflower, and pea shoots are the easiest entry point. They are recognizable, have short cycles, and are hard to fake with conventional alternatives. Specialty crops like shiso or fennel command higher prices but require a buyer who already knows what they are.
Fresh harvested microgreens ready to eat from home grow operation
Packaged microgreens for sale at local market or restaurant supply
What the grow logs showed across the first 20 cycles
Across the first 12 cycles in a non-ventilated room, mold appeared on at least one tray per batch, most often on broccoli and basil. After installing a 15W USB fan running 24 hours at 20cm from the trays, mold events dropped to one in the following 8 cycles and that one was linked to overwatering, not airflow.
Mold rate dropped 60% after adding a continuous fan on the lowest setting during the light phase
Humidity management is not about measuring humidity. It is about moving air. A hygrometer reading of 65% in a still room is not the same as 65% in a room with circulation.
Radish trays sown on the same day, same seed lot, same medium, same tray size produced between 68g and 92g at harvest depending on which shelf position they occupied. Bottom shelves received less LED intensity. Top shelves ran warmer. Neither was tracked until yield logging started.
Harvest weight per tray varied by up to 35% across the same crop in the same week
Shelf position is a variable. Rotating trays between shelves every 24 hours during the light phase reduced variance to under 12% across the same batch.
During a heat period in April, soak time was reduced from 10 hours to 4 hours due to scheduling. Germination rate dropped significantly and the tray produced uneven coverage, which affected total harvest weight.
Sunflower germination rate fell from 94% to 61% when soak time dropped below 6 hours in ambient temperatures above 31 degrees Celsius
Soak time is not a suggestion. In hot climates, the seed hull absorbs water faster but the embryo still needs the full hydration window. Short soaking in heat produces the same germination failure as no soaking in cooler conditions.
Plant Mood grow log data, 2024
More seeds per tray does not produce more yield
Above a threshold seed density, competition for moisture, airflow, and light during the growth phase reduces individual plant development faster than the added seed count compensates. Trays seeded at 40g per 10x20 inch tray consistently outperformed trays at 55g per tray in total harvest weight because the lower-density trays had better airflow at the canopy level, reducing damping off and producing taller, heavier stems.
Plant Mood grow log data, 2024: radish trays at 40g seed weight averaged 81g harvest weight. Trays at 55g seed weight averaged 74g harvest weight. The denser trays also had a higher discard rate due to mold on the lower layer of the canopy.
Most beginners assume that seeding more densely will produce more weight per tray. The logic seems obvious: more seeds, more plants, more harvest.
Common problems in the first two months
My seeds are not germinating evenly, some spots are empty
Uneven seed distribution on the medium combined with inconsistent moisture across the tray. Edges dry faster than the center. Fix: mist more heavily at the edges during the blackout phase, or use bottom watering from day one by pouring water under the tray insert.
My microgreens are getting mold every time on day three or four
No airflow during the germination and early light phase. The canopy is staying wet between waterings. Fix: add a fan, reduce watering frequency, and check that your medium is not staying saturated. In humid climates, once-daily watering is often enough after the blackout phase.
My pea shoots are falling over before I can harvest
Insufficient weight during the blackout phase. The stems grew without resistance and are too thin to support the shoot. Fix: stack a second tray on top of the germinating tray with a weight of at least 1 to 2kg during the first two days.
My yield is inconsistent even when I do everything the same
Shelf position, ambient temperature variation day to day, and small differences in seed weight per tray accumulate into visible yield differences. Start logging tray position, seed weight, harvest weight, and ambient temperature at harvest. The pattern will appear within five cycles.
What beginners do not track but should
Light intensity drops with distance from the LED. A tray on shelf three of a four-shelf rack receives significantly less lux than shelf one. Most beginners do not rotate trays and cannot explain why the same crop produces different yields on different shelves.
Shelf position
Estimating seed quantity by eye produces variance of 20 to 40% between trays. A basic kitchen scale that measures in 1g increments costs under 200 THB and eliminates this variable entirely.
Seed weight per tray
Harvesting at different times of day produces different moisture content in the cut greens, which affects weight and shelf life. Harvest consistently in the morning after the light cycle starts and the leaves have dried.
Time of day at harvest
Seeds sown during a hotter period of the day or season germinate faster and sometimes bypass the optimal window, leading to uneven development. Logging temperature at sow time and at germination check explains a lot of the variance that looks random.
Ambient temperature at sow time
What will happen if you follow this sequence
Growers who start with radish and sunflower and run five consecutive cycles before switching crops will have a lower overall failure rate in months two and three than growers who start with variety packs
Variety packs spread learning across too many variables simultaneously. Repeating the same crop isolates the environment as the only variable and forces faster calibration of watering frequency, seed density, and harvest timing.
Compare failure rates and yield variance across first 10 cycles between single-crop and variety-pack starters in the Plant Mood grow log database, segmented by first crop choice.
Growers in non-climate-controlled tropical environments who do not add active airflow in the first setup will experience at least one mold event in the first three cycles regardless of other practices
Ambient humidity in tropical climates regularly exceeds 70% without climate control. Still air at that humidity level combined with a wet germinating tray produces mold-favorable conditions within 24 to 48 hours.
Track mold event occurrence in first three cycles for new growers in Bangkok, split by presence or absence of active airflow at setup. Log humidity at tray level.
The kit bundles sold to beginners are designed for the wrong problem
Most starter kits include a variety of seeds, a heat mat, and a humidity dome. That combination is designed for temperate climates with cool ambient temperatures where germination heat and humidity retention are the problem. In a Bangkok apartment at 31 degrees Celsius, a heat mat and humidity dome will produce mold in 48 hours. The kit was not built for your environment. The guides that come with it were not written for your climate.
In a tropical climate, the variety approach collapses because the high-difficulty seeds in the kit fail first, discouraging the beginner before the easy crops have run enough cycles to build confidence. The mold on the basil tray does not teach anything about basil. It teaches discouragement. Start with two crops, not eight.
The counterargument is that variety kits let beginners discover which crops they like growing and eating before committing to volume. That is a reasonable position for someone in a stable temperate climate.
Where to start this week
Pick your location first. Measure the humidity there with a basic hygrometer for 24 hours before you buy anything. If it is above 70% and there is no airflow, add a fan before you add seeds. Then buy coco coir, radish seeds, and sunflower seeds. Sow one tray of each. Log the seed weight, the sow date, the ambient temperature, and the harvest weight. Run the same two trays four more times. By cycle five you will know your environment well enough to decide what to grow next.
FAQ
What do I need to start growing microgreens at home?
In order of importance: a location with airflow, a rack with trays, a growing medium (coco coir or jute to start), and seeds. Start with radish and sunflower. Do not buy a variety pack until you have run five cycles of the same crop and understand your environment.
Should I grow microgreens indoors or outdoors?
Indoors gives you control but costs electricity for LED and ventilation, roughly 1,000 to 1,500 THB per month for a two-rack setup in Thailand. Outdoors uses free sunlight but requires a 30 to 40% shade cloth in hot climates and adds variability from weather, insects, and algae growth in hydroponic reservoirs.
What growing medium is best for beginners?
Coco coir for warm or dry environments because it retains moisture well and buffers watering mistakes. Jute mat for humid environments because it dries faster between waterings. Avoid rockwool and hydroton until you understand EC and pH management.
Why do my microgreens keep getting mold?
Almost always a combination of high ambient humidity and no airflow. A continuously running fan at low speed eliminates most mold events. In Plant Mood grow log data, mold rate dropped 60% after adding a 15W USB fan running 24 hours at 20cm from the trays.
Which microgreen seeds are easiest for beginners?
Radish at 5 to 7 days and sunflower at 7 to 10 days. Both have high germination rates and visible, fast failure modes that teach you quickly. Avoid basil and cilantro until cycle five or later. They fail slowly and in ways that are hard to diagnose.
When should I start selling microgreens?
After you can produce the same crop five times with less than 15% variance in harvest weight per tray. Before that, your process is not stable enough to meet a buyer's expectations consistently. Eat your own production during the calibration phase.
What is the difference between a microgreen rack, hydroponic tower, and NFT water channel?
A rack with trays is the right start for microgreens: low cost, flexible, fits in a small apartment. A tower works for leafy crops and herbs but not for microgreens that need a blackout germination phase. An NFT water channel is for higher-volume leafy greens and requires understanding of water chemistry from day one. Start with a rack.